
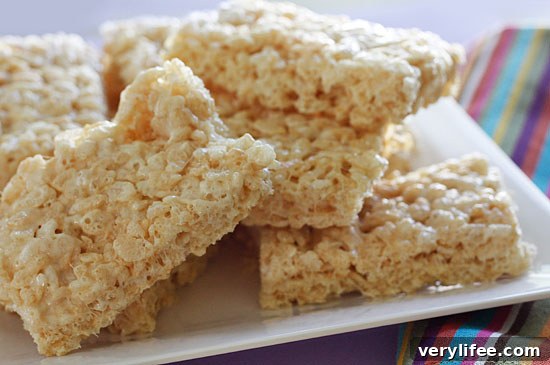
These low-fat Rice Krispy Treats are a simple, satisfying sweet that kids and adults both love. I replaced the usual butter with a light butter spread and used only a small amount, which keeps the texture tender without overloading the recipe with fat. Melting marshmallows and folding in puffed rice can be sticky work, but the result—soft, chewy bars with a classic cereal crunch—is well worth it. No baking required, just a few minutes of gentle stirring and pressing, and you’ll have 16 easy servings perfect for lunchboxes, snacks, or a quick dessert.
Skinny Rice Krispies Treats
Ingredients
- 2 tbsp light butter spread (I used a Smart Balance–style light spread)
- 4 cups (about 10 oz) mini marshmallows
- 6 cups Rice Krispies cereal
- Cooking spray (for the pan)
Instructions
- Prepare a 9 x 12-inch pan by spraying it lightly with cooking spray. Set the pan aside.
- Heat a large saucepan over low heat. Add the light butter spread and allow it to melt, coating the bottom of the pan so the marshmallows won’t stick.
- Add the mini marshmallows to the melted spread and stir continuously over low heat until the marshmallows are fully melted and smooth. Remove the pan from the heat promptly to avoid overcooking.
- Working quickly, add the Rice Krispies to the melted marshmallow mixture and stir until all the cereal is evenly coated. This step is easiest if you move swiftly before the marshmallow begins to firm up.
- Transfer the sticky mixture to the prepared pan. Use a sheet of wax paper or a buttered spatula to press the mixture evenly into the pan without compacting it too firmly—pressing too hard can make the bars dense rather than light and chewy.
- Allow the pan to cool for at least 20–30 minutes, or until the bars have set. Cut into 16 pieces and serve.
Notes and Tips
Use a light touch when pressing the mixture into the pan. A lightly oiled piece of wax paper or the back of a buttered spatula will give you an even surface without compressing the treats too much. If you prefer larger or smaller bars, adjust the cutting to your taste—the nutrition values listed are based on 16 pieces.
Variations
There are lots of simple ways to customize these treats while keeping them relatively low in fat. For a chocolate twist, stir in a handful of mini chocolate chips after the mixture cools slightly, or drizzle a thin line of melted dark chocolate over the top once set. Add a tablespoon of natural peanut butter to the melted marshmallows for a richer, nuttier flavor, or mix in a few tablespoons of puffed quinoa for an extra texture boost. For a festive touch, fold in colored sprinkles or chopped dried fruit.
Storage
Store the cut bars in an airtight container at room temperature for up to 3 days for the best texture. If you need to keep them longer, separate layers with parchment or wax paper and refrigerate for up to one week—note that refrigeration can make them slightly firmer. You can also freeze the treats individually wrapped for up to one month; thaw at room temperature before serving.
Serving Suggestions
These treats are perfect as a quick treat for kids’ lunchboxes, after-school snacks, or a casual party platter. Pair them with fresh fruit or a small glass of milk to balance the sweetness. They are also a fun canvas for dessert stations—offer toppings like toasted coconut, nuts, or a drizzle of caramel so guests can personalize their bars.
Final Note
Please leave a rating and a brief comment telling us how you liked this recipe. Your feedback helps improve the recipe and lets others know what to expect. If you make any substitutions or variations you love, mention those as well so others can try them.