
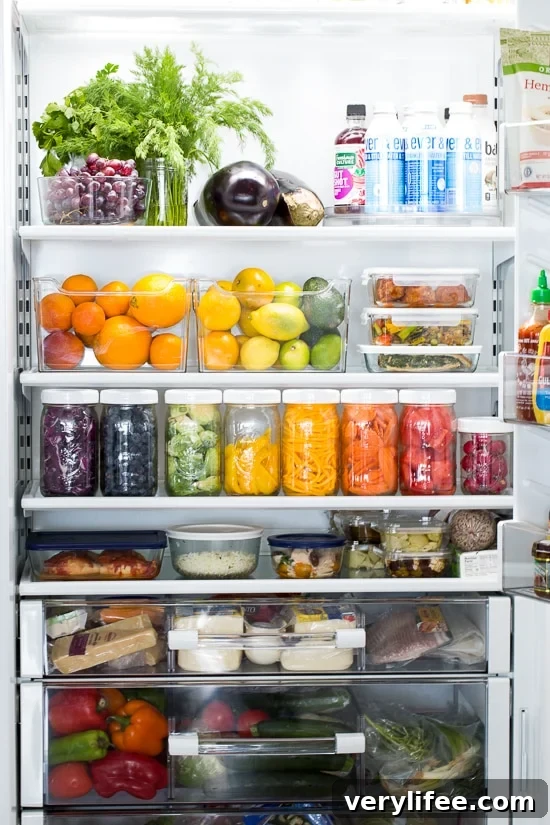
Organizing your refrigerator can simplify meal prep, reduce food waste, and help you save time and money. When everything has a place and you can quickly find what you need, cooking and planning meals becomes easier — and your groceries stay fresher longer. Below are practical, easy-to-follow tips to get your fridge working for you all week long.

5 Tips For Organizing Your Fridge
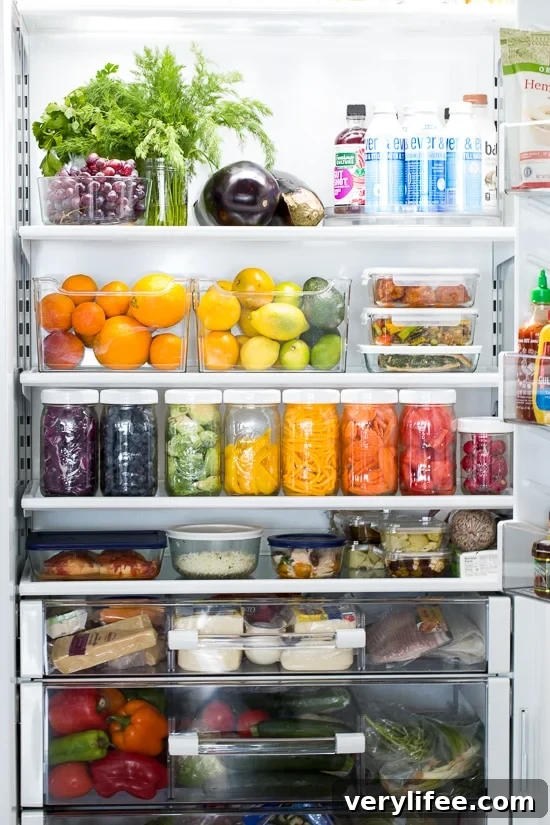
Before you dive in, clear a little time to empty and clean the fridge. Toss anything spoiled or past its prime, wipe down shelves and drawers, and give yourself a clean slate. A fresh start makes it easier to set up a system that lasts.
Why I Chose a Sub-Zero Refrigerator for My Kitchen
When I redesigned my kitchen, my priorities were storage space and food preservation. I chose a Sub-Zero refrigerator because it offered both reliable storage options and features designed to extend food life. For example, some high-end models include air purification systems that reduce ethylene gas and help control bacteria, and many are panel-ready so they integrate seamlessly with cabinetry. That said, the organizing principles below apply to any fridge — you don’t need a specific model to get great results.
Even if your refrigerator is a basic model, consistent placement, appropriate containers, and a few smart habits will keep ingredients fresher and meal prep smoother.
1. Know the temperature and humidity zones in your fridge
- The door: The door is usually the warmest area because it’s opened most frequently. Store condiments, sauces, and other items that tolerate slightly warmer temperatures there rather than milk or raw meats.
- The drawers: Crisper drawers often have humidity controls. Use a higher-humidity drawer for leafy greens and a lower-humidity drawer for produce like apples and peppers to extend freshness.
- The shelves: Keep ready-to-eat items and drinks on upper shelves where temperatures are more consistent. Store raw meats and items that need the coldest temperatures on the bottom shelf to prevent drips and contamination. Dairy often fares best toward the back of the lower shelves where it’s coldest.
- Many refrigerators include a simple guide or “freshness card” that explains ideal placement for different foods. If your fridge doesn’t have one, follow the basic zones above to get started.
2. Set up a use-based system
- Arrange items by how often and how quickly you use them. Keep frequently used staples at eye level and within easy reach. Less-used items can go higher or toward the back.
- Create zones: breakfast items in one area, meal-prep ingredients in another, and snacks in an accessible spot for kids. Consistency helps everyone in the household find what they need quickly.
- Make shelf visibility a priority. Shallow, wide shelves or pull-out drawers make it easier to see everything so food doesn’t get pushed to the back and forgotten.
3. Use clear containers and smart storage to save space
- Invest in a few sizes of clear, airtight containers for prepped ingredients, leftovers, and salads. Clear containers let you see what’s inside at a glance and stack neatly to maximize space.
- Use jars for chopped vegetables, minced garlic, and sliced fruits. Mason jars with secure lids are durable, compact, and great for single-serving portions.
- Designate a deep container or tray for thawing raw meat to catch leaks and avoid cross-contamination. Store raw proteins on the lowest shelf, ideally in a dedicated tray.
- Group similar items together — dairy, sauces, lunch items — and use small baskets or risers to create tiers so nothing gets lost in the back.
4. Keep herbs fresh in jars
- Trim the stems and place herbs upright in a jar with an inch of water, then loosely cover with a plastic bag if you like. Change the water every few days. This method keeps herbs crisp and usable for weeks, which makes it easier to add fresh flavor to meals without waste.
5. Use a lazy susan and label everything
- A small lazy susan is perfect for condiments, jars, and small beverage bottles — it helps you see everything at once and prevents items from getting lost in corners.
- Label containers with contents and date prepared. A simple date system reduces guesswork and encourages eating older items first. Adopt a “first in, first out” routine to minimize spoilage and food waste.
Additional tips: keep a running inventory or sticky note on the fridge listing perishable items you want to use that week, and schedule a quick fridge check before grocery shopping to avoid buying duplicates. A short weekly tidy-up — wiping spills, checking expiration dates, and re-sorting items — keeps the system working long-term.
I’d love to see your fridge transformations. Share a before-and-after photo on social media and tag me if you’d like to show how these tips worked for you!
Disclosure: This post was created in partnership with Sub-Zero, Wolf, and Cover. All thoughts are my own.