If your air conditioning unit is struggling to maintain cool temperatures, the culprit may be dirty or clogged AC coils. When coils are obstructed by debris and buildup, the machine’s efficiency drops significantly, leading to increased energy consumption and higher costs, especially during peak summer months. Regularly cleaning your AC coils is a crucial maintenance task that ensures your system runs effectively and saves you money. This guide provides a detailed, step-by-step process for safely and thoroughly cleaning your outdoor unit.
Supplies Needed
- Foaming Coil Cleaner: Designed specifically for AC coils. A foaming type is recommended as it adheres to surfaces and provides crucial dwell time.
- Shop Vacuum (Shop Vac): For removing dry internal debris.
- Garden Hose: Must be equipped with a gentle nozzle setting (e.g., fan or shower setting).
- Screwdriver/Drill: Necessary for removing the unit’s top screws.
- Timer or Watch/Phone: To track the cleaner’s dwell time.
- Waterproof Footwear (Optional but recommended).
- Safety Gloves (Not explicitly shown but standard safety practice).
Step-by-Step Instructions
- Cut Power to the Unit Safely: Before commencing any cleaning, always turn the power off to the machine. Locate the breaker box, often situated right next to the AC unit. Open the hatch and pull out the breaker handle. Once removed, the machine is de-energized. To ensure safety, set the removed breaker piece aside or place it on top of the box. Crucial Warning: Close the breaker box door to prevent water from entering during the cleaning process. If the detached breaker piece might be subjected to water splash, remove it entirely and place it in a dry location, such as a pocket or garage.
- Remove the Top Cover: Access the interior of the unit by removing the top. Depending on the specific unit configuration, this usually involves removing several screws (sometimes eight or nine) located around the top.
- Handle the Top with Care: When lifting the top cover, proceed slowly. Be extremely careful of the wires and connections that may still be attached, ensuring they are not pinched or damaged. The top may also be heavy. Furthermore, take caution not to damage or bend the fan blades, as any imbalance can lead to operational noise and reduced efficiency after the cleaning is complete. If the top cannot be safely balanced on its side, you may need a cleaning partner to hold it, or you must hold it yourself while working.
- Vacuum Dry Debris: Use a shop vacuum to suck out loose debris from the inside of the unit. Depending on the unit’s location, this may include leaves, bark, and other materials that have worked their way inside. Removing this debris prevents internal clogging and potential running issues. Note: The fins along the coils are highly delicate; apply minimal pressure to avoid bending or warping them while vacuuming.
- Clean Up Loose Debris: Ensure any dust or dry soil removed during the process is picked up and properly disposed of, rather than being dropped nearby, as the machine can suck it back in later.
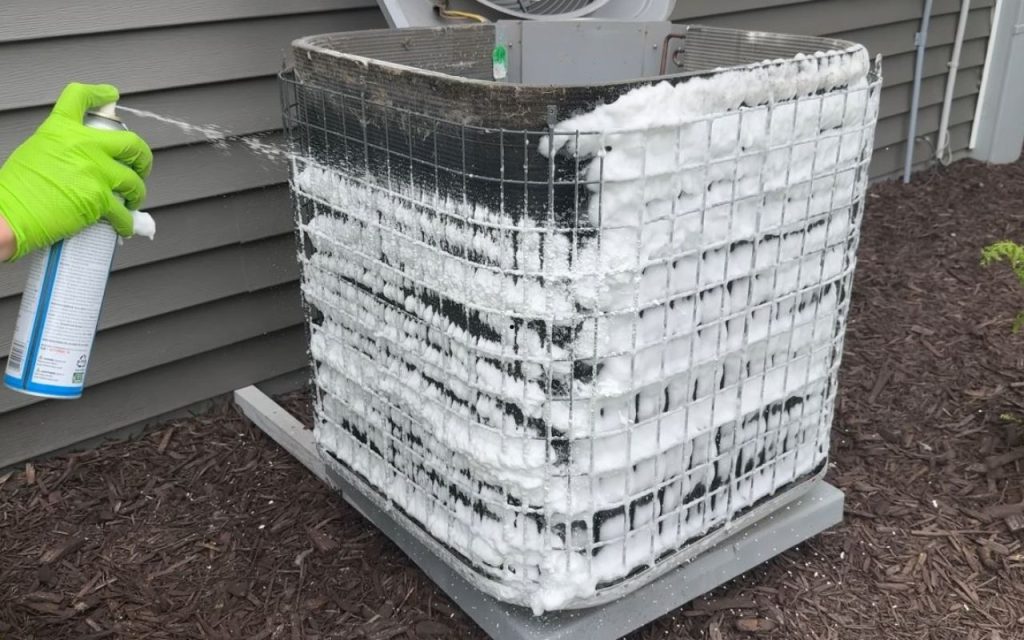
- Apply Foaming Coil Cleaner: Spray the exterior of the coils with the specialized foaming cleaner. Start at the bottom, where buildup is typically heaviest, and work your way up toward the top. Pay special attention to areas with visible accumulation. Ensure the cleaner nozzle provides a straight spray to effectively penetrate deep into the fins, cracks, and crevices.
- Allow for Dwell Time: The foaming action helps the cleaner stick to the coil surface and break down buildup. Allow the cleaner to sit and work for a duration of 10 to 15 minutes. Use a timer to track the dwell time accurately.
- Address Dual-Wall Units (If Applicable): If your unit has a dual-wall coil configuration (two coil walls), note that spraying the outside may not penetrate the inner wall. In this case, it may be necessary to spray the inner wall, focusing on problem areas, to ensure a complete clean.
- Rinse Thoroughly: After the dwell time is complete, begin rinsing. Do not use high-pressure settings or a pressure washer, as high pressure will damage the delicate coil fins. Use a garden hose set to a gentle setting (e.g., fan or shower).
- Rinse Inside Out: Always begin rinsing from the inside of the unit, spraying outward. Since AC units draw air in from the outside, most debris collects there. Rinsing inside out ensures that the debris and cleaner residue are pushed completely out of the machine, rather than being forced further inward. Rinse slowly and thoroughly until the coils are clean.
- Check and Clear Drain Holes: While rinsing, verify that the internal drain holes (ports) are clear of mud and junk, allowing water to exit easily without buildup.
- Reassemble the Unit: Once rinsing is complete and the unit is clean, replace the top cover. Again, be mindful of all wires, ensuring they are loose and not pinched during reattachment. Align the screw holes to secure the cover.
- Restore Power: The final step is to restore power to the machine by correctly reinserting the breaker. Your AC coils are now clean, leading to improved efficiency and potential cost savings.
Additional Tips or Warnings
- Coil Fin Warning: The metal fins lining the coils are extremely delicate. Minimal pressure can cause them to bend or warp, which may damage the machine’s performance. Use only gentle methods for cleaning and rinsing.
- Rinsing Residue: Although some cleaners may be labeled “no-rinse,” it is generally recommended to rinse the unit as thoroughly as possible. This prevents any potentially sticky residue from remaining on the coils, which could attract dirt and complicate future cleaning.
- Recommended Frequency: This detailed cleaning process typically takes 35 to 45 minutes. It is recommended to perform this maintenance at least once per year. If your unit runs continuously or is located in an extremely dusty environment, you may need to clean it more often.
- Realistic Expectations: Since this machine sits outdoors in the elements, it is normal that it may not achieve a “perfectly clean” appearance every time. Minor cosmetic wear, such as a slight gray hue where heavy grime has been removed, is normal and indicates the underlying finish is wearing away.