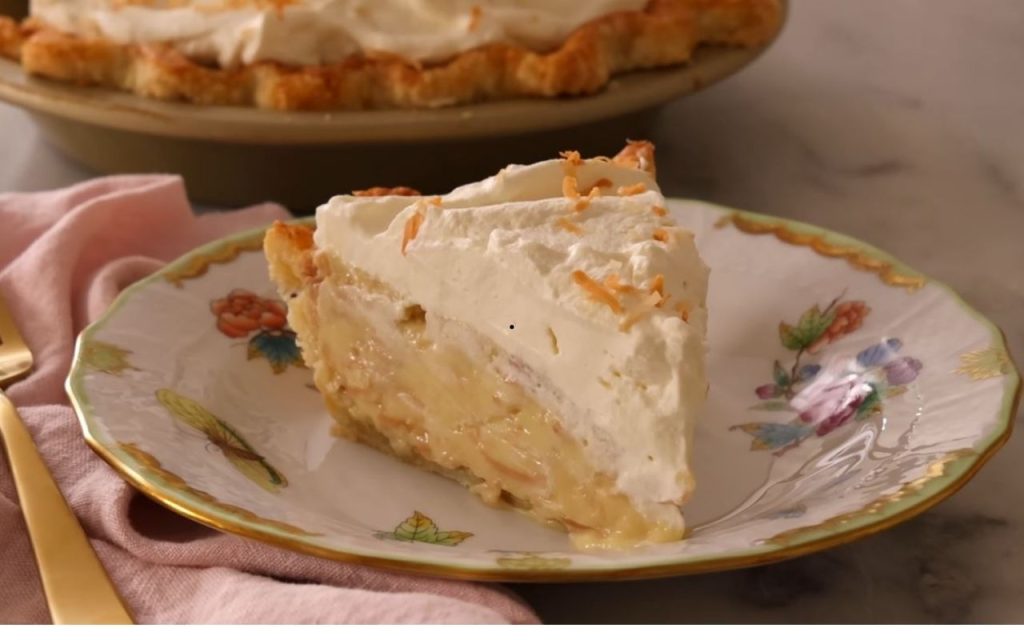
Experience the joy of a truly dreamy, delicious coconut cream pie made entirely from scratch. This recipe pairs a luscious, smooth coconut custard, enriched with toasted coconut, against a crisp, golden butter crust. Far superior to any store-bought version, the contrast of textures and the fresh, real flavor of coconut makes every bite a delight. Coconut cream pie, especially when topped with a mountain of light whipped cream, is simply unbeatable.
Ingredients
I. For the All-Butter Pie Shell
- Prepared, chilled butter pie dough (for a 9-inch pie tin)
- Dried beans or pie weights (for blind baking)
Egg Wash
- 1 Egg
- 1 Tablespoon Cream
II. For the Toasted Coconut
- Sweetened Flaked Coconut (1 1/3 cups for filling, plus extra for garnish)
III. For the Creamy Coconut Custard Filling
- 1 1/2 cups Half and Half or Whole Milk
- 1 1/2 cups Coconut Milk
- 2 Whole Eggs
- 2 Egg Yolks
- 1 cup (200 g) Granulated Sugar
- 5 Tablespoons (40 g) Cornstarch
- 1/4 teaspoon Salt
- 1/4 cup (57 g) Cubed Butter
- 1 1/3 cups Toasted Sweetened Flaked Coconut
IV. For the Whipped Cream Topping
- 2 cups Cold Heavy Cream
- 1/4 cup (30 g) Powdered Sugar
- 2 teaspoons Vanilla
Instructions
Part 1: Preparing and Blind Baking the Crust
- Roll the Dough: On a floured surface, roll the chilled pie dough into a 13-inch circle, adding flour as needed to ensure it does not stick.
- Form the Shell: Center the dough in a 9-inch metal pie tin (metal works better than glass). Gently push the dough towards the middle without stretching it. Trim any massive excess dough, then fold the remaining edge and crimp the crust using a fork or your fingers.
- Chill: Chill the formed pie shell in the refrigerator for at least one hour, or freeze it for 30 minutes, until it is nice and firm.
- Preheat: Towards the end of the chilling time, preheat your oven to 425$^\circ$ F. A very hot oven is necessary for blind baking.
- Blind Bake (First Phase): Pull the chilled crust out of the freezer/fridge. Place a round of parchment paper in the center, followed by a thick length of foil, folded onto itself several times. Press the foil firmly against the side of the pie dish, as this area is prone to sinking. Fill the shell completely with dried beans or pie weights to support the crust and prevent bubbling.
- Bake: Bake for 15 to 25 minutes, or until the edges are golden brown. Rotate the pie if your oven has hot spots.
- Egg Wash and Final Bake: Carefully remove the foil, paper, and weights. Prick the bottom of the crust about 12 times (known as docking) to allow steam to escape. Whisk the egg and cream together to form an egg wash. Brush the egg wash all over the crust, particularly the inside, as it creates a moisture barrier to keep the crust crisp.
- Protect Edges: Place a pie tent or a loosely folded foil strip around the edge of the pie to prevent burning, since the edges are close to being done.
- Finish Baking: Return the crust to the oven for 10 to 15 more minutes, until the crust is golden all over and crisp throughout. Remove and allow the pie shell to cool.
Part 2: Toasting the Coconut
- Prepare: Spread the sweetened flaked coconut onto a baking sheet in a nice thin layer.
- Toast: Toast at 325$^\circ$ F for about 15 minutes, stirring every 3 to 5 minutes to prevent the edges from burning.
- Cool: Allow the toasted coconut to cool completely. Measure out 1 1/3 cups for the custard filling.
Part 3: Making the Coconut Custard Filling
- Prepare Eggs: Whisk together the two whole eggs and two egg yolks; set aside.
- Warm Milk Mixture: In a small saucepan, combine 1 1/2 cups of half and half (or whole milk) with 1 1/2 cups of coconut milk. Coconut milk is often lumpy with solid fat on top; warm this mixture over medium heat, stirring occasionally, until the solids have broken up and the liquid is smooth and warm. Remove from heat.
- Combine Dry Ingredients: In a medium pot, combine the granulated sugar, cornstarch, and salt. Mix these ingredients thoroughly.
- Thicken Base: While constantly whisking, pour the warm milk mixture into the sugar and cornstarch mixture. Place the pot over medium heat, whisking constantly until the mixture starts to bubble, thickens, and coats the back of a wooden spoon. Remove from heat.
- Temper the Eggs: To prevent the eggs from scrambling, slowly drizzle about one cup of the hot milk solution into the egg mixture while whisking vigorously.
- Complete the Custard Base: Pour the warmed egg mixture back into the main pot of milk solution, continuing to stir until silky smooth.
- Final Cook: Return the mixture to medium heat for 2 to 3 minutes, stirring constantly (but not vigorously whisking). The mixture is ready when it thickens significantly and a whisk or spoon leaves a trail in the custard. Remove from heat.
- Add Butter and Coconut: Whisk in the 1/4 cup of cubed butter until it is completely dissolved. The butter adds richness and stability, and helps the custard cool down. Finally, fold in 1 1/3 cups of toasted coconut until it is nicely distributed.
- Cool Slightly: Allow the filling to cool for 10 minutes before assembling the pie.
Part 4: Assembly and Chill
- Fill the Shell: Pour the slightly cooled filling into the fully cooled, golden pie shell. The filling will look liquidy when hot but will set as it cools.
- Chill: Place the pie in the refrigerator for a minimum of 6 hours or, ideally, overnight, until it is completely set.
Part 5: Whipped Cream Topping
- Whip Cream: Combine the 2 cups of cold heavy cream, powdered sugar, and vanilla in a bowl. Start mixing on low speed, then increase to high until soft peaks begin to form (this takes about 2 minutes).
- Finish: Finish the mixing by hand until you achieve beautiful, perfectly stiff peaks that are still luscious.
- Serve: Use a spatula to scoop the whipped cream onto the chilled pie, creating a glorious mountain. Garnish the top with additional toasted coconut shavings.
Optional Tips
- Dough Cracks: If your chilled pie dough cracks while rolling, pinch the edges together, let it sit for a minute or two, and then continue rolling.
- Preventing Bubbles (Aesthetics): If you notice a giant bubble forming during the second baking phase (after docking), check the crust regularly. While the crust is still hot and malleable, use a small knife to poke the bubble and then press it down using the bottom of a measuring cup to level it out.
- Protecting Hot Spots: If you notice a dark spot forming on the inside of the crust during baking, cover that area with a small piece of aluminum foil and continue baking.
- Whipped Cream Consistency: For perfect whipped cream every time, use ice-cold heavy cream, and chill your mixing bowl and whisk beforehand. Stop whipping right before the cream is ready, and then finish the mixing process by hand.
- Storage: The finished pie will last up to 4 days in the refrigerator. If you wish to freeze it, wrap it well and freeze it for up to 2 months without the whipped cream topping, then thaw overnight in the refrigerator.