Ceiling fans often accumulate a significant amount of dust, making cleaning them a necessary but sometimes overlooked task. In this guide, we’ll explore effective methods for how to clean ceiling fans efficiently, ensuring a dust-free environment and optimal fan performance.
However, cleaning them can be annoying because it often means you need to use a step stool and it creates a mess. Here’s how to clean a ceiling fan without getting dust everywhere. (The good news? You likely already have what you need for cleaning at home.)
When to Clean Your Ceiling Fan
Ceiling fans can collect dust fast, so it’s smart to dust them every week and do a thorough cleaning once a month. This is especially important during very hot or cold months when you use the fan more to make the air feel better.
What to Consider Before Starting
First, make sure the fan is off. Use a sturdy step stool or ladder right under the fan, and avoid using unstable chairs. It’s also a good idea to have someone nearby in case you need help. Make sure the area is well-lit, either by opening window coverings or using extra lights.
Choose a cleaning day when you have time to dust and vacuum the whole room. Even if you cover the floor with a bed sheet or tarp, some dust might still get out. A good tip is to clean the fans on the same day you change your bed sheets. You can use the old top sheet to catch dust, then shake it outside and wash it like normal.
When cleaning, start from the top and work your way down—clean the fan first, then dust the furniture and shelves, and vacuum the floor last.
What You’ll Need
Collect the cleaning supplies you need, based on how you want to clean and how much dirt has built up on your ceiling fan.
- A step stool or ladder
- A pillowcase
- A drop cloth or sheet
- Microfiber cloths
- A ceiling fan duster
- Vinegar solution or all-purpose cleaner
- Warm soapy water
Using a pillowcase is a great way to clean a ceiling fan because it keeps most of the dust inside and prevents it from spreading. Here’s how to do it:
Step 1: Prepare the area around the ceiling fan
Put down a drop cloth and set up your step stool to keep the area clean.
Step 2: Clean each fan blade with a pillowcase
Place a clean pillowcase over the end of a fan blade and hold it tightly around the blade with your fingers. Slide the pillowcase along the blade to capture the dust inside. Do this for each blade.
Tip: For a better clean, spray the inside of the pillowcase with a mix of half vinegar, half water, or use an all-purpose cleaner.
Step 3: Clean the motor housing
Wipe the motor housing with a dry microfiber cloth or duster to remove any dust.
Step 4: Empty the pillowcase
Take the pillowcase outside, turn it inside out, and shake out the dust. Then, wash the pillowcase as you normally would.
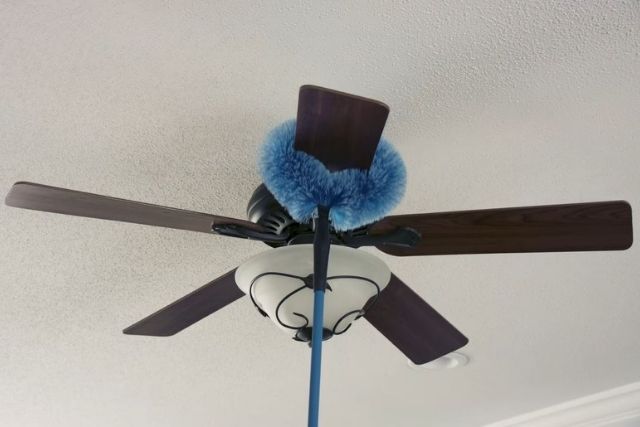
Cleaning a Ceiling Fan with a Duster, No Ladder Needed
If your ceiling fan is too high for your step stool, or if you prefer using a duster, here’s another method to clean your ceiling fan. Keep in mind that this technique might drop more dust into your room, so make sure to use a drop cloth and plan to dust and vacuum thoroughly afterwards.
Step 1: Prepare the ceiling fan for cleaning
Lay down a tarp or sheet, and you might want to wear a hat or kerchief to keep dust out of your hair.
Step 2: Use your duster
Use any microfiber duster with an extendable wand, though a duster specifically designed for ceiling fans works best. These have a curved end and microfiber shag that cleans both the top and bottom of each blade in one swipe.
Move it over the dirty areas, and be ready for some dust to fall.
Step 3: Clean the housing and light fixture
Use a regular extendable duster to clean the motor housing and reach other dusty spots.
How to Clean a Very Dirty Ceiling Fan
Fans in kitchens, bathrooms, and outdoor patios often get dirtier because of grease, hairspray, or other particles in the air, so they need more frequent cleaning. This is when you really need to use cleaning products.
Step 1: Apply your cleaning solution to a microfiber cloth
Use an all-purpose cleaner or a vinegar solution, but remember to never spray the solution directly onto the fan. Instead, spray it onto the cloth.
Step 2: Clean the ceiling fan blades
Gently wipe both sides of the blades and the motor housing. Frequently rinse the cloth in clean water and squeeze it out until it’s not dripping.
Step 3: Let the blades dry
Keep the blades dry because wet blades can attract more dust. Wait until the blades are completely dry before turning the fan back on.
Cleaning Your Ceiling Fan’s Light Fixture
The glass on your ceiling fan’s light fixture can get as dusty as the blades, so clean it when you notice dust build-up.
Step 1: Remove the light fixture glass
If you have someone to help, they can hold the glass globes as you remove them from the fan.
Step 2: Clean the light fixture
You can clean the glass globes in the dishwasher or by hand in warm, soapy water. Make sure they’re completely dry before putting them back on the fan.
Step 3: Replace any burned-out bulbs
While you’re up on the ladder, replace any light bulbs that have burned out.
Step 4: Put the light fixture back together
Securely fasten the bolts or other fasteners before turning the fan back on.