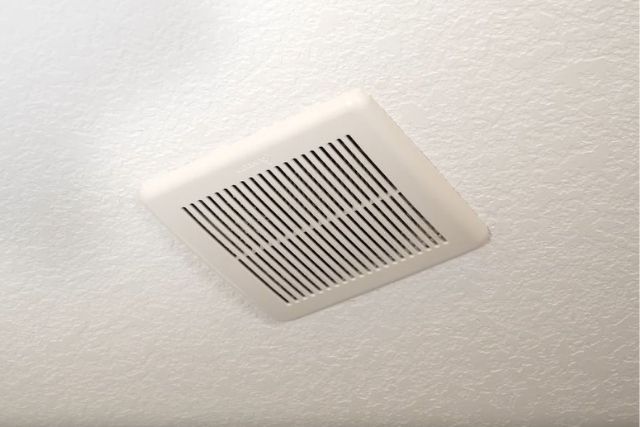
Your cleaning list might have a lot of items, and it’s easy to overlook the bathroom exhaust fan. But this fan is important because it helps remove extra moisture and stops mold and mildew from forming. To avoid dust collecting on the fan cover and motor, clean it once or twice a year. This easy bathroom cleaning task only takes about 20 minutes and you need just a few tools. Keep reading to find out how to clean your bathroom exhaust fan.
Getting Ready
To safely clean a bathroom exhaust fan, first turn on the fan using its switch so it’s running and you can hear it. Then, switch off the breaker for the bathroom to cut the power. Check if the power is truly off by ensuring that the fan and lights in the bathroom do not work. This confirms it’s safe to proceed. Keep a flashlight nearby in case you need more light.
Next, get a stepladder that lets you easily reach the ceiling. Carefully remove the cover of the exhaust fan. Some covers are held by pins on the sides that you need to press; others might be screwed in, so have a screwdriver ready. If the fan is plugged into a socket, unplug it and unscrew any brackets securing it.
Needed Supplies
Tools:
- Sponge
- Damp microfiber cloth
- Vacuum cleaner with a crevice tool attachment
- Optional vacuum brush attachment
- Stepladder
- Flashlight
Materials:
- Liquid dish soap
Cleaning a Bathroom Fan
A bathroom exhaust fan consists of three main parts: the cover, fan blades with motor, and the housing. Using the fan regularly pulls moisture and airborne dust out of the room. However, this dust can accumulate, insulating the motor and potentially causing it to overheat. It’s crucial to take off the cover and clean each part well to remove dust. Try to do this cleaning at least once a year.
Cleaning the Fan Vent Cover
Take off the vent cover and let it soak in a tub of hot, soapy water to loosen any built-up gunk. Scrub off any stubborn dirt using a damp microfiber cloth. Make sure the vent cover is completely dry before you put it back together.
Cleaning the Fan Blades
Twist the fan and motor assembly to detach it from the exhaust vent. Clean the fan blades and motor using a damp cloth. For tougher, hard-to-reach dust, use a vacuum attachment. If you can’t take the fan down from the ceiling, try to remove as much dust as possible using a vacuum with a crevice tool.
Cleaning the Fan Housing
Attach the crevice tool to your vacuum and clean inside the exhaust vent. Also clean the brackets that secure the fan. If you don’t have a crevice tool, a brush attachment works too. The aim is to get rid of as much visible dust and dirt as possible.
Drying and Reassembling the Fan
Put the fan and motor assembly back into its housing and fasten it with the brackets or screws provided. Wiggle the fan with your fingers to ensure it’s not touching anything. If necessary, plug the fan back into the outlet.
Once the cover is fully dry, reattach it to the bathroom exhaust fan. Press on the cover until the clips snap shut. If your cover uses screws or fasteners, screw it back into place.
Turning the Power On
Go back to your breaker and turn the power back on. Test your cleaned bathroom exhaust fan to make sure it works properly before you start using it regularly again. Now that it’s free of dust and grime, your fan will remove moisture more effectively, helping to prevent mold and mildew. A clean fan is not only safer for your home but also healthier for you.
Cleaning Frequency for Your Bathroom Fan
Your bathroom exhaust fan needs regular maintenance to function well. You should clean it at least once a year, or twice if your bathroom is used frequently. The fan’s main job is to remove moisture, but if it’s clogged with dust and other particles, it won’t work as efficiently.
If you don’t clean your fan, excess moisture can build up, leading to mold and mildew growth, rust on metal surfaces, and peeling paint. A dirty fan can also overwork and burn out its motor.
Make sure to include cleaning your bathroom fan in your annual cleaning schedule to keep your home clean and safe.