If you are looking for a dessert that delivers maximum flavor with minimal effort, Banoffee Pie is the ultimate answer. A portmanteau of “banana” and “toffee,” this beloved dessert originated in England in 1971 at a restaurant called the Hungry Monk. While the original creators experimented with various fruits including apples and mandarin oranges, they discovered that bananas and toffee were truly a “match made in heaven”.
This recipe features a buttery graham cracker crust filled with rich dulce de leche, fresh bananas, and crunchy English toffee bits, all topped with a mountain of homemade whipped cream. It is a stunning, multi-layered treat that looks impressive but is incredibly straightforward to assemble.
Ingredients
The Crust
- 2 cups (240g) graham cracker crumbs
- 1/4 cup (55g) brown sugar
- 10 tbsp (141g) melted butter
- A pinch of salt
The Filling
- 2 cans (14oz each) Dulce de Leche (divided use)
- 3 ripe bananas
- 1/2 cup English toffee bits
The Topping
- 2 cups cold heavy cream
- 3 tbsp granulated sugar (or powdered sugar)
- 1 tsp vanilla extract
- Optional: Extra toffee bits or chocolate shavings for garnish
Instructions
1. Prepare and Bake the Crust Preheat your oven to 350°F (175°C). In a medium bowl, combine the graham cracker crumbs, brown sugar, and a pinch of salt. Break up any lumps of sugar with your hands before mixing. While stirring, drizzle in the melted butter until the mixture resembles “delicious wet sand”.
Transfer the mixture into a 9-inch pie dish. Press it firmly into the bottom and up the sides to create an even layer. Using a flat-bottomed glass or measuring cup can help compact the crust, while using your index finger to keep the top edge neat. Bake for approximately 8 minutes until fragrant, then allow it to cool completely.
2. Add the Dulce de Leche Base Once the crust has cooled, spread 1 1/2 cups of dulce de leche across the bottom in an even layer. Dulce de leche is a thick, milk-based caramel with a rich flavor that isn’t overly sweet.
3. Layer the Bananas and Toffee Slice the bananas into coins and arrange them over the caramel base in concentric circles. Sprinkle 1/2 cup of English toffee bits over the bananas for a delightful crunch.
4. Seal the Filling Apply a second, thinner layer of dulce de leche (about 1/4 cup) over the toffee and bananas to “seal” everything in.
- Note: Because dulce de leche is thick, you can pipe it over the top, or warm it in the microwave at half-power in 10-second bursts until it is drizzle-able. If spreading it manually, you can dip your spatula in warm water to smooth it out without lifting the layers beneath.
5. Make the Whipped Cream In a stand mixer or using a hand mixer, combine the cold heavy cream, granulated sugar, and vanilla extract. Whip starting on low speed and working up to high. Aim for soft, luscious, silky peaks.
- Pro Tip: Stop the mixer when the cream is “almost there” and finish whisking by hand. This gives you total control and prevents the cream from becoming granular or over-whipped.
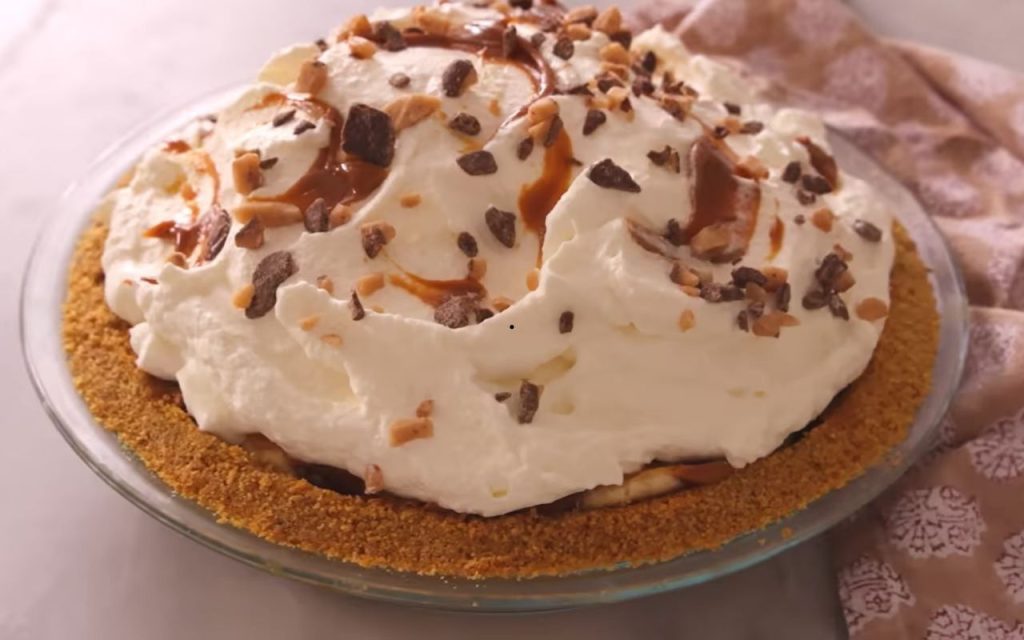
6. Assemble and Garnish Mound the whipped cream onto the center of the pie and spread it toward the edges. For a professional finish, warm another 1/4 cup of dulce de leche until pourable and drop teaspoons of it onto the whipped cream. Swirl the caramel into the cream using a spatula, cleaning the tool between swoops to keep the white cream looking clean. Finish by sprinkling extra toffee bits or chocolate shavings on top.
7. Chill and Serve Refrigerate the pie for 30 minutes to 3 hours to allow it to set. It is best enjoyed within this window to prevent the bananas from oxidizing and changing color.
Tips for Success
- Crust Consistency: If you are unsure if your crust mixture is ready, look for a texture similar to wet sand that holds its shape when pressed.
- Smoothing Sticky Caramel: If your dulce de leche is too thick to spread easily over the textured filling, heat a cup of water in the microwave. Dip your spatula into the hot water to warm the metal; this will melt the surface of the caramel slightly, allowing you to smooth it out effortlessly.
- Whipped Cream Texture: If you struggle with whipped cream turning grainy, ensure your bowl and whisk are chilled. Also, be mindful of the brand of cream you use, as stability can vary.