A crisp, perfectly baked pie crust is truly the co-star of any great dessert or savory dish. Forget the disappointment of store-bought crusts; making your own takes just minutes of active prep time and offers unparalleled buttery taste and flaky texture that cannot be matched. This all-purpose dough is versatile enough for quiches, galettes, and any sweet or savory pie, ensuring a magnificent foundation every time.
We will guide you through creating the dough and achieving a perfect “blind bake” (fully baked crust) essential for no-bake fillings like creamy chocolate mousse or lemon curd, or for creating an extra crisp base for baked pies like pumpkin or apple.
Ingredients
This recipe yields a double crust (two discs of dough).
- 3 cups All-purpose flour (divided)
- 1 Tablespoon Granulated Sugar
- 1 teaspoon Salt
- 1 cup (2 sticks) Unsalted Cold Butter, cubed
- 4 Tablespoons Ice Water (plus 1 to 5 extra tablespoons, added as needed)
- For Egg Wash (Optional Par-Bake Step):
- 1 Egg
- 1 Tablespoon Water
Instructions
Part I: Preparing the Dough
- Combine Dry Ingredients (First Batch): In a food processor or large bowl, add 1 and 1/2 cups of the all-purpose flour, 1 tablespoon of sugar, and 1 teaspoon of salt. If using a food processor, pulse a few times to combine.
- Add First Half of Butter: Add 1/2 cup (1 stick) of the cold, cubed butter. Process for about 30 seconds, or until the mixture is nice and crumbly, resembling coarse sand. (If working by hand, cut the butter in until you have a mix of almond-sized pieces and smaller flecks of butter).
- Add Remaining Ingredients: Add the remaining 1 and 1/2 cups of flour and the remaining 1/2 cup (1 stick) of cold, cubed butter. Pulse the mixture just two times to incorporate slightly.
- Incorporate Ice Water: Measure out 4 tablespoons (1/4 cup) of ice water. Drizzle the water into the mixture and pulse a few times.
- Test for Readiness: The goal is a shaggy mixture that just holds together. To test, press a handful of the mixture together into a fist; if it holds its shape, it is ready. If it falls apart, add water 1 tablespoon at a time, pulsing between each addition, until the dough holds together when pressed.
- Shape the Dough: Dump the shaggy mixture onto a clean countertop. Use the flat palm of your hand to gently press and work the dough together. Do not knead or overwork the dough, as this makes it tough. Flatten any remaining pieces of butter.
- Chill: Divide the dough into two equal-sized pieces. Shape each piece into a disc and wrap tightly in plastic. Refrigerate for at least 1 hour, or up to 2 days. (The chilling process allows the butter to harden and the flour to fully hydrate, which prevents shrinkage during baking).
Part II: Rolling and Shaping the Crust
- Prep: Once chilled, flour your surface (a pastry mat works well) and flour your rolling pin. If the dough is too hard and cracks immediately, let it sit on the counter for 5 to 10 minutes to warm slightly.
- Roll: Roll the dough out into a circle approximately 14 inches wide. Keep the dough moving to prevent sticking, and add flour as necessary. If cracks develop, simply pinch them together.
- Transfer to Pan: Use a 9-inch metal pie pan, as metal transfers heat better, yielding a crisper crust. Transfer the dough carefully, folding it into quarters or wrapping it around the rolling pin.
- Fit the Dough: Center the dough in the pan. Important: Gently push the dough into the pan from the edge, ensuring you do not stretch the dough. Stretching the dough will cause it to shrink when baked.
- Finish Edges: Trim any large excess and fold the edge over itself to add strength. Crimp the edges as desired, or use a fork to press the edge down.
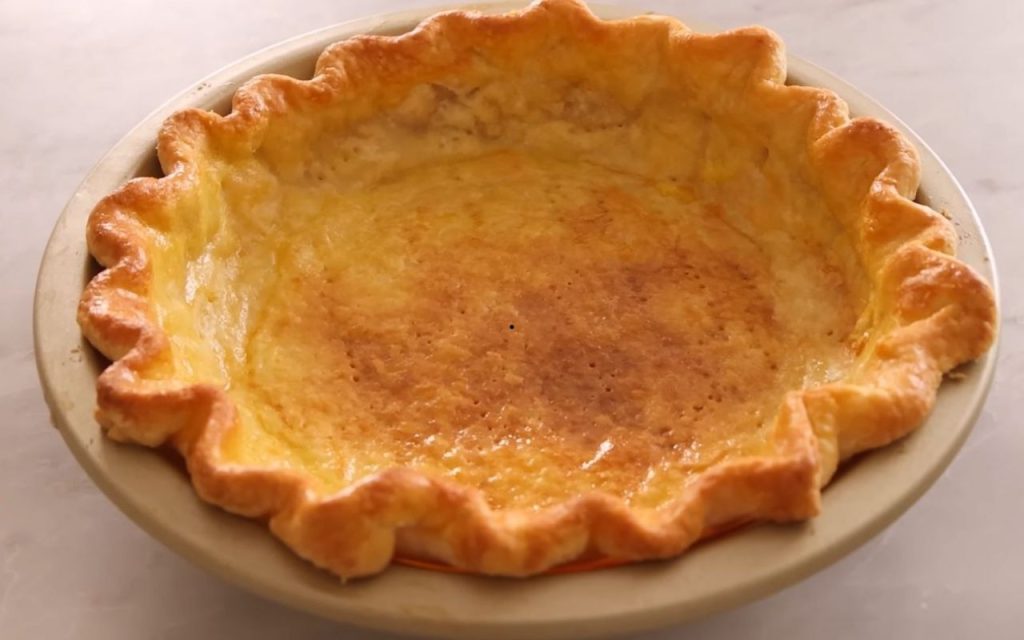
- Dock and Freeze: Use a fork to poke many holes (dock) in the bottom of the crust. This allows steam to escape, preventing the crust from puffing up into a giant bubble during baking. Place the shaped crust into the freezer for 30 minutes to ensure it is rock hard before baking.
Part III: Blind Baking (Full Bake for No-Bake Fillings)
- Preheat: Towards the end of the chilling time, preheat your oven to 425°F.
- Support the Crust: Line the frozen crust with parchment paper, followed by heavy-duty foil (tripled up is recommended). The foil provides support to prevent the vulnerable dough from slumping during the initial bake.
- Add Weights: Fill the foil-lined crust with pie weights or dried beans to hold the crust down and prevent bubbling.
- First Bake: Bake at 425°F for 20 minutes. If the edges begin to burn, tent the exposed edges with loose strips of foil.
- Egg Wash Application (Par-Baking): Remove the crust from the oven. Carefully remove the foil, paper, and weights. Whisk together the egg and 1 tablespoon of water for an egg wash. Brush the egg wash all over the bottom and sides of the crust. This provides a golden color, shine, and a moisture barrier to prevent a soggy filling.
- Final Bake: Redock the bottom lightly to create fresh holes for steam. Return the crust to the oven for about 10 more minutes at 425°F, or until the entire crust is beautifully golden and dried throughout. If the center is light, continue baking while ensuring you tent the edges to prevent burning.
Optional Tips
- Flavor Boosts: For savory pies (like quiche), mix lemon zest or fresh/dried herbs (such as thyme) into the flour at the very beginning. For sweeter pies, add a teaspoon of cinnamon or pumpkin pie spice.
- Alternative Fats: While this recipe uses all butter, you can experiment. A 50/50 mix of vegetable shortening and butter creates a more tender, flaky crust, though some buttery flavor is lost. Cream cheese can be used for a slightly tangy taste and tender texture.
- The Vodka Trick: To ensure minimal gluten development, substitute half of the ice water with vodka. The alcohol evaporates during baking but helps the dough stick together without activating the proteins in the flour.
- Make Ahead: Dough discs, wrapped well, last in the freezer for up to three months. You can also shape the crust in the pie dish, wrap it, and freeze it, ready to fill later.