If your shower tile and grout are plagued by soap scum, grime, or mold, this step-by-step guide will show you the most effective and safe cleaning methods—from light daily maintenance to deep restorative cleaning for neglected grout lines.
Everyday Tile and Grout Cleaning
For Light Mess (1–3 on the “Messometer”)
For routine maintenance, a gentle and affordable DIY solution can be very effective.
- Mix 1 teaspoon of dish soap with warm water in a spray bottle.
- Spray generously over tile and grout.
- Scrub the surface and let sit for 5–10 minutes.
- Rinse thoroughly with water.
Why it works: Dish soap acts as a degreaser, breaking down soap scum and body oils. It’s also gentle enough for delicate surfaces like marble or other natural stones that can be damaged by acidic or alkaline cleaners.
Bonus Tip for Glossy Tiles
After rinsing, use a dry microfiber cloth to buff glossy or mirror-like tiles. This prevents streaks and water spots for a polished finish.
Tool Recommendation
Invest in a drill brush scrubber to speed up the cleaning process and reduce physical strain. These brushes attach to a drill and make scrubbing effortless.
Moderate Grime Removal (4–6 on the “Messometer”)
DIY Hydrogen Peroxide & Baking Soda Paste
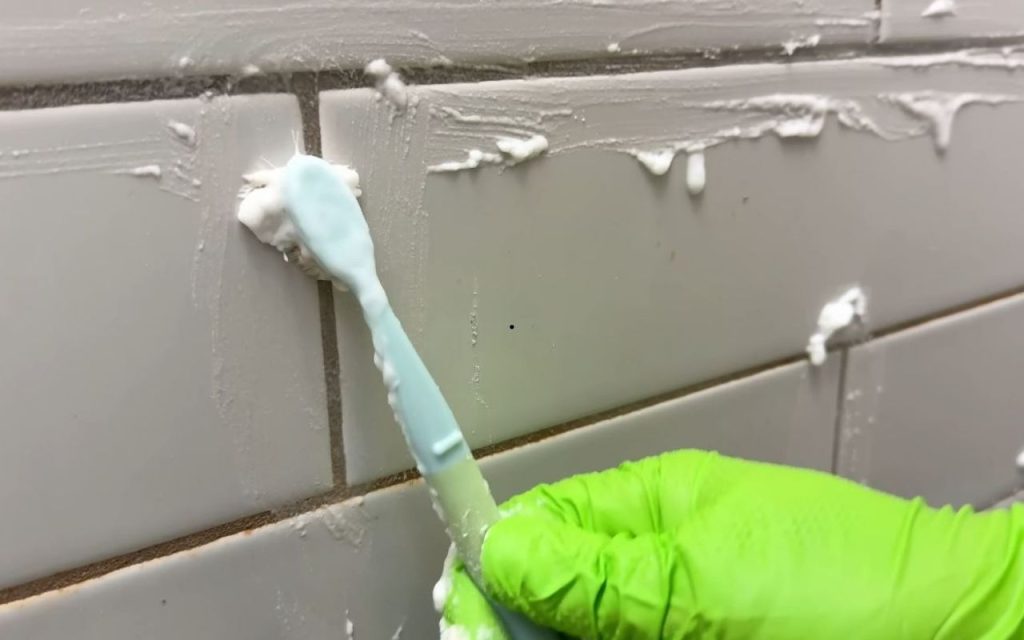
- Mix 3% hydrogen peroxide and baking soda into a runny toothpaste-like paste.
- Apply with a toothbrush or nylon grout brush into grout lines.
- Let sit briefly and then scrub thoroughly.
- Rinse well to prevent residue or haze.
Note: Avoid metal brushes (stainless steel or brass), especially on gloss tiles, as they can scratch surfaces. Nylon brushes are safer and usually sufficient.
Store-Bought Alternative
If you prefer a commercial cleaner, Clorox Cleanup with Bleach works well:
- Spray onto affected areas and let sit for 5 minutes.
- Scrub grout lines thoroughly.
- Rinse well.
Severe Buildup & Stains (7–10 on the “Messometer”)
Zep Grout Cleaner & Brightener
This is a heavy-duty solution for severely stained or neglected grout.
- Apply directly to grout lines.
- Let sit briefly until bubbling begins.
- Scrub thoroughly and rinse completely.
Important Safety Tips:
- Wear old clothing—this product can bleach fabrics.
- Never use on natural stone; it can cause irreversible damage due to its high acidity.
Bonus: This cleaner also brightens grout, restoring original color once dry.
Steam Cleaning Option
A steam cleaner is a chemical-free alternative using pressurized hot steam to break down grime. Though more expensive, it’s highly effective and safe for various surfaces.
Dealing with Mold and Mildew on Caulking
Surface Mold Solution
- Apply Sugary Gel Cleaner directly to the moldy caulking.
- Let it sit for 24 hours.
- Rinse thoroughly.
Deep Mold Issue
If mold has penetrated behind the caulking, surface cleaners won’t help. You’ll need to:
- Cut out the old caulk.
- Clean and dry the exposed area thoroughly.
- Reapply fresh caulking.
Grout Cleaning Do’s and Don’ts
- Do ensure proper ventilation. Open windows or use fans during cleaning.
- Do test any new product in a small, inconspicuous area first.
- Do not mix cleaning products. Always rinse completely before switching cleaners.
- Never use toilet bowl cleaner on grout. It may cause irreversible stains or damage.
How to Seal Your Grout
Once your grout is completely dry and clean, sealing helps prevent future staining and reduces the need for deep cleaning.
Steps to Seal Grout
- Use a bottle of sealer with a brush-tip (e.g., Miracle Sealant).
- Apply a bead along each grout line, working slowly and methodically.
- Wipe away any excess from the tile with a microfiber cloth.
Reminders:
- Wait at least 24 hours after cleaning to ensure grout is fully dry.
- Make sure no dirt remains before sealing—sealed-in grime is hard to remove later.
- Apply an adequate amount—grout is porous and absorbs sealant like a sponge.
Final Thoughts
By using the right method based on your grout’s condition, you can restore your shower to a like-new shine. Whether it’s a gentle daily clean or a full restoration with deep-cleaning products, following these best practices will ensure lasting results.